

The Bean Palette:
|
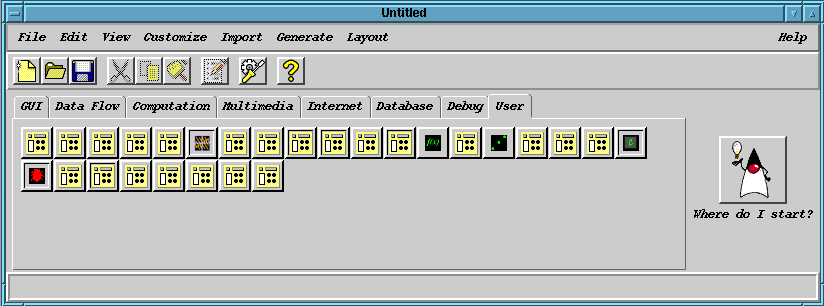
This component includes all of the java beans that Java Studio has available for use in programming. They are organized into different classes with the OpenMath Beans being found in the "User" class. (The classes are accessed by clicking on the "tab" corresponding to the class.) |
The Design Window:
|
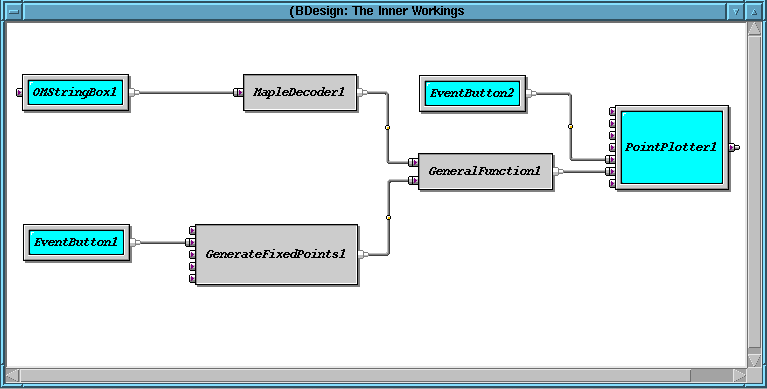
This window is the window in which you "wire together" the Java Beans. To bring a Java Bean into this window, click and release on the in the Bean Palette and then click in the design window. |
The GUI Window:
|
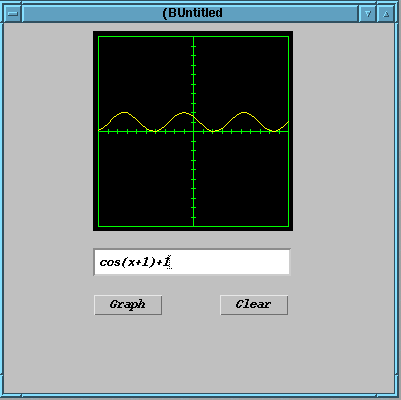
This window displays the applet as it is being wired together. It allows the programmer to test the applet as it is being built and to see how it will appear. |

| BEAN: | FUNCTION [1]: | ROLE IN FUNCTION PLOTTER: |
| OMStringBox |
TextField which takes in a String and sends an OMString to all listeners. This bean allows the user to enter in a String in a TextField. The String is then sent as an OMString to all listeners (such as a Codec bean). The String is sent when either the enter key is hit or the bean loses focus. The TextField can also receive events containing OMStrings and display them. |
This bean presents the user with a text box in which to enter the function. |
| MapleDecoder |
Maple OMString to OMObject converter. This bean takes in an OMString and converts it to an OMObject using the MapleOMCodec. |
When the "Graph" button is clicked, this bean listens for the string of characters that the user has entered in the "OMStringBox" text area and converts the string into a mathematical entity. |
| EventButton |
A simple ActionEvent generating Button bean. This bean is a simple button that generates an ActionEvent. Its title may be set by introspection. The Button was created to allow a button that would work with Sun's Java Studio, and conform to the 1.1 event model. (may not be supported in future releases) |
The plotter uses two of them: one labeled "Graph" to trigger the graphing process and another labelled "Clear" to clear the graph. |
| GenerateFixedPoints |
This bean listens for an EventObject (like the one generated by EventButton). When received it sends an OMApplication list of vectors to all OMEventListeners. Each vector is an (x,x) pair, where each x is separated by StepValue, and falls between MinValue and MaxValue. The bean effectively generates a set of points to be modified by a function bean. |
When the "Graph" button is clicked, this bean sends the 'x' values to the "GeneralFunction" bean. |
| GeneralFunction |
This bean listens for two OMEvents: an OMApplication list of vectors, and an OMApplication function. The bean outputs the list of vectors with the function applied to each y value. The Function MUST use OMVariable "x" as its variable. Currently, openmath.util.EvalFloat is used to evaluate the function. |
When the "graph" button is clicked, this bean listens for the the 'x' values from the "GenerateFixedPoints" bean and the function from the "MapleDecoder" bean. It generates (x,f(x)) pairs. |
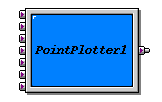
| PointPlotter |
This bean takes in an OMApplication list of vectors and plots them with dots on a cartesian grid. Presently datapoints that fall outside of the graph area are discarded!!! |
When the "graph" button is clicked, this bean listens for (x,f(x)) pairs from the "GeneralFunction" bean. It plots line segments between successive (x,f(x)) pairs on a cartesian axis. |

| Purpose: | to become acquainted with the Java Studio programming environment |
| Overview: | In this activity, you will use Java Studio to reproduce the simple function plotter described above. |
| Procedure: | |
Load Java Studio | |
Ensure that you have the OpenMath beans. They should be found in the "User" class of the Bean Palette. The Bean Palette should look like this:  If you do not have the OpenMath Beans you will need to download them and import them. Follow the instruction on the PDG download page. | |
As they appear in the palette, most of the beans are represented by the generic OpenMath bean icon: In order to discover the name of a particular bean, hold the mouse pointer over top of it without clicking; its name will appear momentarily. | |
The simple function plotter uses the following beans:
| |
You now need to "wire together" the beans that you have brought into the Design Window. You connect the beans by joining output (event triggering) connectors, located on the right of the bean image, to input (event listening) connectors, located on the left of the bean image. You connect output connectors to input connectors by clicking and holding on the output connector and dragging to the appropriate input connector. Acceptable connections are indicated by the connecting wire turning green while "illegal" connections are indicated by the connecting wire turning red. Wire up the beans as indicated in the screen shot of the Java Studio development environment at the top of this page. | |
As a final step, arrange and size the function plotter components in the GUI Window. You may have been tempted to do this as you brought the beans into the Design Window. There is nothing wrong with doing it this way; the components can be rearranged and resized at any time. Once you are satisfied with the appearance of your plotter, if you wish, you can generate an Applet under the "Generate" menu of the Bean Palette. Click here to view the working applet. |


| Purpose: | to use OpenMath beans and beans supplied with Java Studio to modify the function plotter to allow the user to set 'x' and 'y' scalings and set the step value. |
| Overview: | In this activity, you will make modifications to the function plotter that will allow the user to adjust the step value and the scaling of the domain and range. You will also create labels for your step value , domain, and range settings. |
| Procedure: | |
Load Java Studio and load the simple function plotter of activity 1. | |
The first thing modification that you are going to make is to give the user a box in which she can adjust the step value. (The step value is the distance between successive 'x' values used to generate (x,y) pairs. A smaller step value will produce a smoother graph but take longer to process if performance is a consideration.) You will need to add an OMFloatBox bean and make the appropriate connection. When looking for the appropriate connection, consider which bean is responsible for producing the (x,y) pairs. After you have wired it up, test your step value control to make sure that it works. You will also need to label the step value box in the GUI window. The "Label" bean is found in the GUI tab of the bean palette. | |
The next modification will be to give the user boxes in which he can set the minimum and maximum 'y' values. Add two more OMFloatBoxes. To wire them up, you will need to find the appropriate connections; consider which beans have a direct role in processing and displaying the data. Once your controls are working, add labels as in step 2. | |
Finally, you will need to give the user boxes in which she can set the minimum and maximum 'x' values. This is a little bit more complicated because two different OpenMath beans want to know what the maximum and minimum 'x' values are: GenerateFixedPoints needs to know what domain to generate fixed points on and PointPlotter wants to know what values to display. This creates a problem because OMFloatBoxes only have one output connector. Follow these steps:
Note: When reloading applets that have OMFloatBoxes into JavaStudio, you may have problems with values in these FloatBoxes being interpreted properly when the applet is tested in the JavaStudio test environment. The solution for this is to delete and reinsert any eventButtons that are involved with triggering the sending of input from these float boxes for processing. See the section on Design and Builder Environment Considerations for more information. |

Modify the function plotter of Activity 2 to to allow the user to see what happens when translations are applied to the 'x' and 'y' variables. You should add two more OMFloatBoxes to the design corresponding to translations on 'x' and 'y' respectively. Click here for a screen shot of the design window of a solution for this exercise. | |
Design and test an applet that allows users to create a filled polygon and then apply 'x' and 'y'translations to the polygon. You will need the following beans:
Click here for a screen shot of the design window of a solution for this exercise. Click here to view the working applet. | |
Design and test an applet that allows users to create a filled polygon and then apply a rotation to the polygon. You will need the following beans:
Click here for a screen shot of the design window of a solution for this exercise. | |
Modify the polygon rotation of exercise 3 to accept rotation angles in degrees. You will need to add a MultiplyOMFloat bean (the conversion factor for converting degrees to radians is 0.017453293). Click here for a screen shot of the design window of a solution for this exercise. Click here to view the working applet. | |
Create a filled polygon applet that allows users to apply horizontal and vertical scaling factors to the polygon. This can be accomplished by replacing the GenerateRotationMatrix beans in exercises 3 and 4 with a GenerateScalingMatrix bean. You will also need two OMFloatboxes: one for the horizontal scaling factor and one for the vertical scaling factor. Click here for a screen shot of the design window of a solution for this exercise. | |
Create a filled polygon applet that allows users to translate, rotate, and apply horizontal and vertical scaling factors to the polygon. Click here to view the working applet. |


| [1] | The descriptions in this column are paraphrased from the PolyMath Development Group's documentation for the 0.5 release of the OpenMath Beans. |
| [2] | The OpenMath PointPlotter bean is one of the beans in the PolyMath Development Group's 0.5 alpha release of OpenMath Java packages. These packages are described on the PDG's Java OpenMath Library page. |